

ALHENA Manual.
English Ctrl+P to print
Products: Alhena
ALHENA EN


Thanks for choosing an OFFCARR product.
OFFCARR listens and responds to the customers' needs by engineering highly technical, innovative solutions aimed at reducing daily mobility problems, with special attention to product style and to improving quality of life.
OFFCARR has a certified system for quality management following UNI EN ISO 9001 regulations and a Medical Device - Quality management system following UNI EN ISO 13485 regulations.
OFFCARR products comply with the european medical device regulation UE MDR 2017/745.

|
Before using or making adjustments on this device, read this instruction manual carefully. |
|
|
Different versions of this manual, accessible for various types of visual disabilities are available on www.offcarr.com |
Contact an authorized dealer or the manufacturer at the following address if clarification regarding the safety measures is required.
|
OFFCARR srl |

|
MADE IN ITALY |

|
Distributor: |
|
|


1. Labelling
Each OFFCARR product is identified by a unique serial number. The serial number, along with other information, is shown on a sticker applied to the frame. |
|

|
Product sticker (applied on the frame) |
|
UDI sticker (applied on the frame and on the instructions for use) |
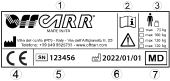
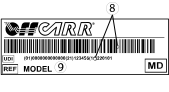
Information available on the product sticker: |
|
|
|
1.1. Symbols description
|
Please read all instructions before using the device. Read all Cautions and Warnings carefully. |
|
European Conformity - The symbol denotes conformity to European standards. |
|
WARNING: Read carefully and follow the indications. |
|
NOTE: Auxiliary information. |
|
Medical Device |
|
UDI: Unique Device Identifier |
|
Serial Number |
|
Reference - The symbol indicates the model of the product. |
|
The symbol indicates the country of origin. |
|
The symbol indicates the distributor of the product. |
|
The symbol indicates the manufacturer of the product. |
|
The symbol indicates the maximum load permissible for the product. |
|
The symbol denotes the attachment points for crash tested models. |
|
The symbol denotes the importance of protecting the packaging and the product from harsh weather. |
|
The symbol denotes that shipment must be performed with care and the package must always be kept and stored with the arrows pointing upwards. |









2. Using the device
|
|
To use the device correctly and safely, it is always recommended to clarify any doubts with qualified personnel. |
Hereafter are some suggestions and recommendations for a correct use of the device, also aimed at maintaining its safety and durability characteristics over time:
-
The brakes only have a parking purpose and should never be used as service brakes to slow down the device in motion.
-
To ensure the efficiency of the brakes, keep the tyres properly inflated and check the wear of the knurled locking pins every 3 months.
-
The anti-tip wheels (if present) must never be used as transit wheels.
-
Do not lean too far forward; excessively shifting the centre of gravity could cause the device to tip over.
-
Always deal with slopes above 6° with assistance from an attendant. This limit is only approximate and it depends on the configuration, in particular on the position of the centre of gravity of the user-wheelchair system.
-
The device must be used only to transport a person, not objects.
-
The armrests, if present, are not designed to lift the device.
-
Avoid wheeling the device without the supervision of an attendant.
-
Prolonged contact of the device with water or prolonged exposure to high humidity levels can cause unwanted oxidation of some metal parts and decay of the safety characteristics of the materials involved.
-
Avoid contact with seawater and sand. In case of contact, proceed with immediate and thorough cleaning.
-
Perform a general check of the device at least every three months, checking tyre inflation, the efficiency of the quick-release axles and brakes; lubricate the moving parts whenever necessary.
-
Clean the device with a damp cloth and avoid even partial immersion of the frame. Keeping the device clean increases its efficiency.
-
Suspend use of the product and notify OFFCARR in case of allergies or other similar problems due to contact with the materials that make up the device.
-
The fabric used for the device’s upholstery is washable with low-temperature water. In any case, avoid wetting or immersing other parts of the device.
-
There is no danger of causing injury to people during the operations of preparation and setup of the device, if carried out carefully following the instructions provided in this manual.
|
|
Make sure the tyres are correctly inflated. The inflation pressure depends on the tyre model; find the correct pressure shown on the tyre’s sidewall. |
|
|
Keep the device away from heat sources, as not all the components are fireproof. |

|
Upholstery materials comply with the EN 1021-2:2014 regulation. |
|
|
The approximate lifespan of the device is 7 years, considering correct, normal daily use by a single user and regular maintenance. |
3. Warnings to reduce any risks associated with misuse of the device
|
|
It is forbidden to use the device or its parts in different ways from those described in this manual. |
|
|
When opening or closing the wheelchair, pay attention to the position of the fingers (see [setup]) to avoid being pinched between the frame and the crossbar tubes. |
|
|
Do not use the brakes to slow down the device at any speed. They are designed only as parking devices. |
|
|
Do not use the armrests to lift the device or as clamping points. |
|
|
The anti-tip wheels (if present) must never be used as transit wheels. They are not designed for this purpose. |
|
|
It is recommended to frequently check the working order of the quick-release axles, especially that they are properly secured after each insertion. |
|
|
The gap between wheels and side-guards or brakes could be lower than 25 mm. Be careful not to put your fingers between the wheels and side-guards or brakes to avoid injury. |
|
|
To maintain the device and its safety requirements, it is recommended to uphold a regular maintenance schedule, as described in this manual. |
|
|
Poor maintenance and improper use of the device can cause damage or injury to the user or assistant. |
|
|
Any tampering with the components of the device, as well as voiding the warranty, could compromise its structural integrity and safety standards. |
|
|
With pneumatic tyres, it is recommended to reduce their pressure in the case of air transport, to avoid collateral effects of pressure variations due to altitude. |
|
|
Contact OFFCARR in case the maximum user weight is exceeded at any point during the device’s lifespan. |
|
|
Contact OFFCARR or your reseller to check for compatibility with accessories produced by a manufacturer different from OFFCARR. |
|
|
Do not install mechanical or electronic devices on the device that are not approved by OFFCARR, and do not modify its structure in any way. Any combination with other medical devices must be expressly authorized by OFFCARR. If the combination has been approved, always refer to the respective manuals. |
|
|
The device and its accessories are not suitable for use in hyperbaric chambers under any circumstances. |
|
|
In case of prolonged exposure to the sun, the surface of the device can reach high temperatures. |
|
|
For more information about the connection points and devices needed to secure the device during transport by car (valid exclusively for crash tested models), see 7, “Attachment of the wheelchair for use within a motor vehicle” |
|
|
Activate both brakes before every transfer to/from the device. Always perform transfers with caution. |
|
|
Some openings in the device may have angles lower than 75° (e.g. the space between wheel spokes) or gaps smaller than 25 mm (e.g. the gaps between spokes or between frame parts when opening or closing). Be careful. |
|
|
For technical and aesthetic reasons, the pushing handles may be placed at a height lower than 900 mm from the ground. |
|
|
Headrests (optional) are not approved for use as headrests on moving vehicles. |
|
|
The tip assist pedal and anti-tip devices are optional accessories that must be requested when ordering the device. |
|
|
Do not exceed the maximum load of the device, even temporarily. For example, do not perform activities such as weightlifting on the device. |
4. Product presentation
4.1. ALHENA
Alhena are non-invasive medical devices specifically designed to reduce and counterbalance motor impairments in the medium and long-term.
This wheelchair is manually propelled on the back wheels, it allows for many configurations and a wide range of accessories to meet the needs of users.
Configuration and adjustment must be performed exclusively by qualified personnel.
|
|
It is forbidden to use the device or its parts in different ways from those described in this manual. |
4.1.1. Description
|
|

4.1.2. Features
-
Ultralightweight wheelchair
-
Titanium folding frame
-
Titanium double crossbar
-
Two angle-shaped front frame
-
Multiple positions for rear wheels
-
Tilt adjustable front fork support
-
Carbon fibre side-guards
-
Foldable and detachable armrests (if selected on the setup)
-
Footrest according to the choice during setup
-
Different kind of side-guards and armrests
-
The order form allows different setups and various combinations of accessories.
-
Maximum load: 120 kg
4.1.3. Technical data
All measurements are in degrees (°) and millimetres (mm), the weight is expressed in kilograms (kg).
| ALHENA | Reference values UNI EN 12183 1 | |
|---|---|---|
Maximum weight capacity |
120 kg |
|
Max load for use on vehicle |
120 kg |
|
Weight 2 |
from 9.7 kg |
|
Seat angle |
0° ÷ 20° |
|
Backrest angle |
90° |
|
Leg angle |
76° ÷ 90° |
|
Total width |
max. 740 |
7001 |
Total length |
max. 1200 |
12001 |
Total height |
max. 1100 |
12001 |
Pivot turn width |
max. 1650 |
13001 |
Turn width |
max. 1300 |
10001 |
Frame warranty |
3 years |
|
Expected service life |
7 years |
All measurements refer to wheelchairs in standard configuration
The addition of accessories may modify the indicated measurements and weight
Reference configuration: L 46, P 46, camber 4°
1 Some measurements may exceed the reference values according to UNI EN 12183. In some circumstances and with certain configurations, the use of safety exits may be complicated or impossible
2 The weight depends on the selected configuration and may vary based on accessories
4.1.4. Rear wheel and pushrim diameter
The table indicates diameter of rear wheels and relative pushrims.
| Rear wheel diameter | Pushrim outer diameter (average) |
|---|---|
24" |
535 mm |
25" |
550 mm |
5. Preparation for use
|
|
The preparation for use of these devices must be performed by qualified personnel to ensure the specific suitability of the product for the user and the correct working order of all parts and accessories, as well as to provide clear instructions to the user. |
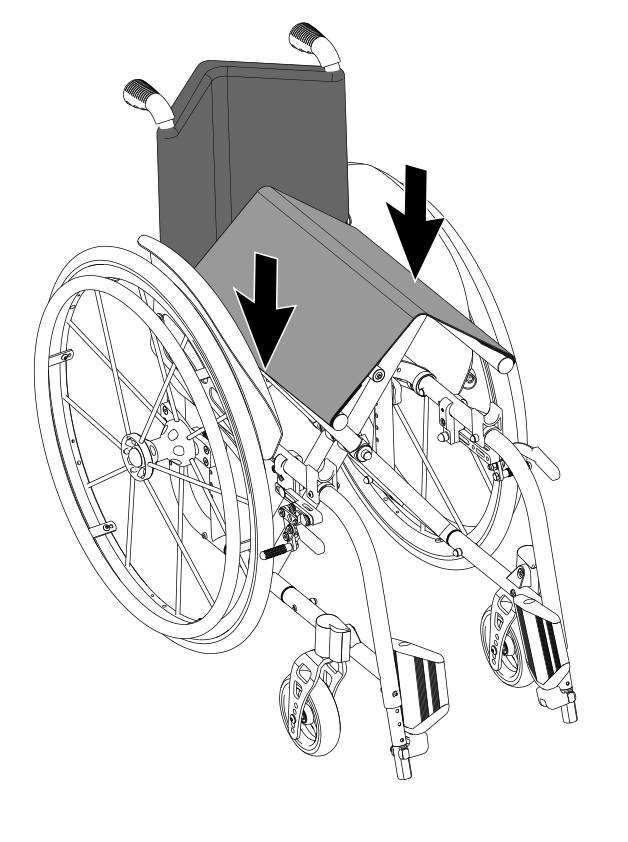
5.1. Wheelchair opening
Apply pressure with the open palm over the sides of the seat, as shown on the drawing, until the seat is perfectly aligned to the frame |
|
|
|
Place your hands only on the upper part of the seat support tubes without wrapping them to avoid crushing of the fingers during the opening operation |
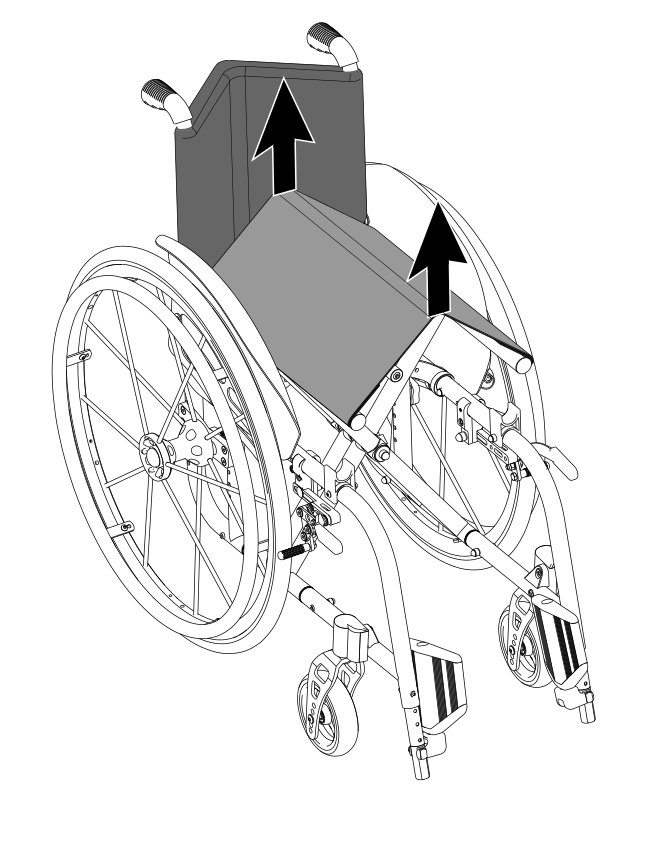
5.2. Wheelchair folding
If necessary, fold up the footplate(s) to allow the folding of the wheelchair frame Pull the seat upholstery upwards with both hands as shown on the drawing |
|
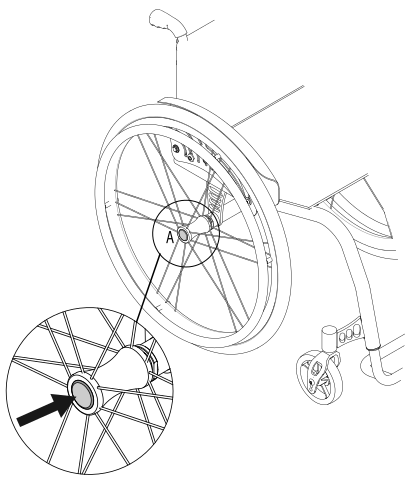
5.3. Rear wheels release and re-engagement check
|
|
Verify proper operation of the quick-release axle devices before using the wheelchair. |
The wheelchair is usually shipped with the rear wheels already mounted.
|
|
|
|
For safety reasons it is important to repeat this test every time that for transport or maintenance reasons, the rear wheels are removed and reassembled to the frame. |
5.4. Tyre pressure check
A periodical check of the tyre pressure helps to keep the device efficient and more comfortable
Verify the tyre pressure value according to the value marked on the tyre. Indicatively the maximum pressure for the most common wheels is:
-
7.5 bar (750 kPa - 110 psi) for high pressure wheels
-
4.5 bar (450 kPa - 65 psi) for 20", 22", 24" x 1.3/8" wheels
-
2.5 bar (250 kPa - 30 psi) for pneumatic castor wheels
|
|
With pneumatic tyres, it is recommended to reduce their pressure in the case of air transport, to avoid collateral effects of pressure variations due to altitude. |
5.5. Brakes check
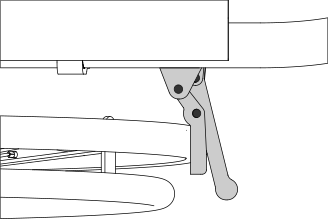
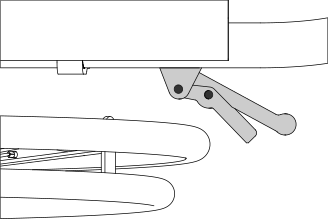
To check the correct functioning and the efficiency of the parking brakes:
-
activate the brakes (ON position)
-
check if the wheels are locked in place
|
|
Pushing brake ON position |
Pushing brake OFF position |


|
|
Pulling brake ON position |
Pulling brake OFF position |


|
|
Scissor brake ON position |
Scissor brake OFF position |


|
|
Composite brake ON position |
Composite brake OFF position |
|
|
Drum brake ON position |
Drum brake OFF position |
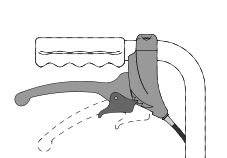
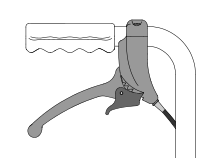
|
|
Single brake lever side ON position |
Single brake lever side OFF position |
|
|
Single brake opposite to lever side ON position |
Single brake opposite to lever side OFF position |


|
|
Brake type availability is limited depending on the chosen configuration. Not all brake types are available for every setup. |
|
|
The included brakes, except for the assistant-activated brakes (drum), must be used exclusively as parking brakes and never as service brakes. |
|
|
To ensure the efficiency of the brakes it is necessary to maintain the proper tyre pressure and check the wear of the clamping elements frequently. |
5.6. Accessories check
Some accessories required when setting up the wheelchair may be supplied separately. You must assemble them and check their operation before you start using the wheelchair.
6. Accessories
OFFCARR can be configured with different accessories, described in the following paragraphs.
6.1. Armrests
OFFCARR wheelchairs can be equipped (with some limitations) with:
-
open Desk armrest (to be used with side-guards fixed to the frame)
-
open Sport armrest (to be used with side-guards fixed to the frame)
-
open U armrest (to be used with side-guards fixed to the frame)
-
tip-up height adjustable L armrest (to be used with side-guards fixed to the frame)
|
|
|
Desk, open armrest |
Sport, open armrest |
U Type, open armrest |


L Type, tip-up and height adjustable armrest |
||
|

|
|
Open or closed armrests (not height-adjustable) are available in two heights: 22 or 27 cm |
|
|
All armrests are supplied in a tip-up and removable version. Conflicts caused by particular configurations may affect the choice of armrests. It is anyways always possible to disable armrest tilting. |
|
|
The armrests are not designed to lift the wheelchair, either with or without a user. |
6.1.1. Tip-up armrest
According to configuration limitations, Desk, Sport and U model armrests can all be folded down.
To flip the armrests over:
|
|
|


6.1.2. Detachable armrest
Desk, Sport and U armrests are always detachable.
To remove the armrests:
|
|
|
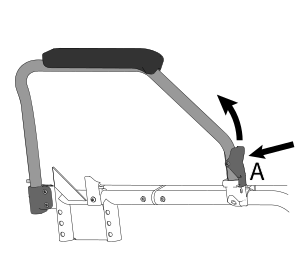
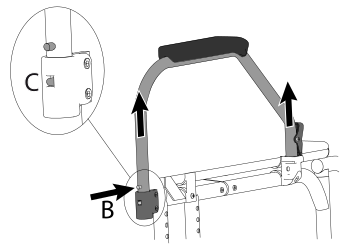
|
|
When reinserting the armrest on the rear support, make sure that the pin C is fully inserted on its guide. This guide prevents the armrest once opened from rotating sideways when it is not locked at the front. |
6.1.3. Height adjustable armrest
Desk, Sport and U armrests are also available with height adjustable elbow-rest.
To raise/lower the elbow-rest:
|
|
|


6.1.4. Armrest Integrated in the side-guard
Depending on the selected configuration, the side-guard can incorporate the adjustable armrest.
To raise/lower the armrest:
|
|

6.1.5. L type armrest, tip-up and height adjustable
Unless specifically requested, the standard height of the armrest from the seat is 220 mm. However, it is also possible to increase or decrease it by 20 or 40 mm after the order has been placed.
To adjust the height of an L type armrest:
|
|
If provided by the selected configuration, it is possible to tilt the armrest backwards and extract it. |
|


6.2. Anti-tip device
OFFCARR can be equipped with left and/or right anti-tip devices.
|
|
Never use the anti-tip devices as transit wheels. It is not their intended purpose. |
6.2.1. Use of the revolving anti-tip device
When not in use the anti-tip device is positioned horizontally under the frame:
6.3. Single drive
The wheelchair could be configured with a single-sided double-pushing pushrim. The single-sided double pushrim system consists of a wheel that, in addition to having the normal pushing pushrim, has a second one with a smaller diameter; this second pushrim, via a connecting axle, transmits the rotational motion to the opposite wheel without the pushing rings. The single drive option is also applicable in after-market situations by replacing the rear wheel support plates with plates suitable for the new application.
Inserting the wheel connection axle:
-
open the wheelchair
-
ensure that the wheels are properly fitted to the plates (see 5.3, “Rear wheels release and re-engagement check”)
-
sit the user in the wheelchair
-
insert the connecting axle A on the rear wheel axle pins W, making sure that the coupling of the toothed ends is complete
-
move the wheelchair back and forth a few centimetres to allow for any settling
-
secure the axle locking wing screw B
|
|
Before fixing the locking wing screw, it is recommended that, with the user seated in the wheelchair, a small movement of the wheelchair is carried out to allow for any settling in width and to reduce any play on the couplings between the connecting axle and the rear wheel studs. Single-wheel hubs have pins with a toothed end for precise connection to the connecting axle. |
|
|


6.4. Hinged backrest
The only purpose of the articulated backrest is to reduce the height of the wheelchair for easier transport. The mounting height of the joints may vary depending on the configuration choices of the device. The joints on the backrest maintain the height adjustment feature of the backrest itself (see 15.13, “Backrest height adjustment, pushing handles adjustment”) |
|

Hinged backrest cannot be assembled with lateral supports nor stretch bar.
|
|
If the wheelchair is used with a stair lift, any hooks must rest on the fixed part of the backrest under the joint and must not under any circumstances rest on the articulated upper part of the backrest. |
|
|
It is recommended to ensure that the backrest is properly latched when climbing steps or ascending/descending even slight inclines. |
6.5. Lever-activated small wheels for narrow passages
Lever-operated narrow passage small wheels are devices that make it easier to lift the wheelchair so that the rear wheels can be pulled out and the width of the wheelchair reduced. They can be activated by the attendant, and in some cases also by the user himself. Once the narrow lever passages have been activated, make sure that the locking knob is properly engaged in its seat. To deactivate the wheels, pull the knob upwards so that it disengages from its seat and then pull the lever down. |
|
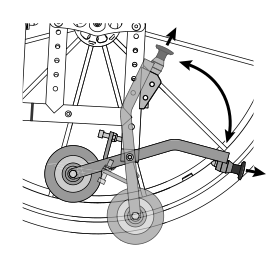
This device has some configuration limitations mainly related to the rear height of the seat from the ground and the size of the push wheels.
|
|
Lever push wheels are incompatible with some chassis and rear wheel configurations. |
|
|
Lever-mounted narrow passage wheels are incompatible with any imbalance pedals and anti-tip devices. |
|
|
Lever-mounted narrow passage wheels are always incompatible with wheelchairs configured with a curved rear. |
6.6. Tip assist pedal
The tip assist pedal is a useful device to aid an attendant when overcoming small steps or to facilitate movement over uneven terrain, gravel and cobblestones.
6.6.1. Curved rear frame tip assist pedal:
In frames configured with a curved rear, the anti-tip pedals are independent devices connected to the frame using the same holes available for attaching the rear wheel plates. In these frames it is not possible to select both anti-tip and off-setting on the same side at the same time. |
|
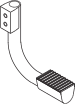
6.6.2. Straight rear frame unbalancing system
In frames configured with straight rear frame, the unbalancing pedal is integrated into the wheels for narrow passages support, so in case of aftersales addition request it is necessary to replace the complete support. Under the same configurations, the unbalancing pedal is also used as a support for the anti-tip device. |
|

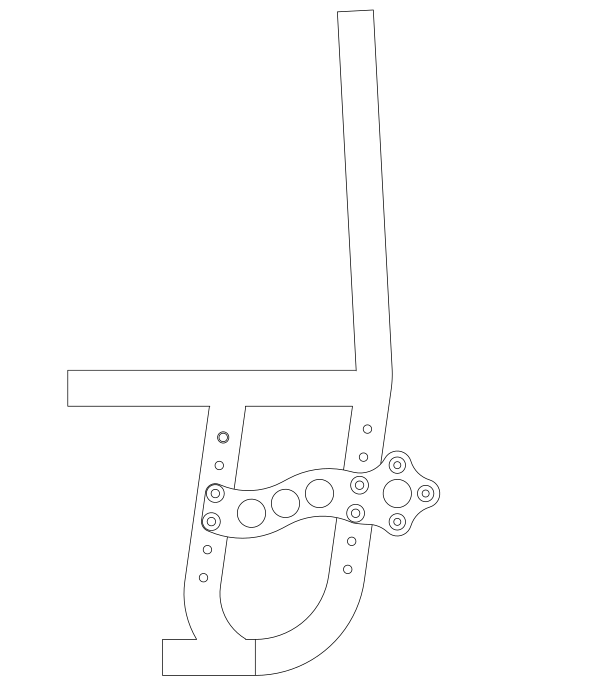
6.7. Extended wheel plates
Extended wheel base plates for the push wheels are designed to retract the rear wheel axle and thus increase the stability of the wheelchair under certain conditions. The retraction of the push wheel axle shifts the centre of gravity of the user and wheelchair complex forward, making the wheelchair more secure. At the same time, it makes it less agile to drive and somewhat more difficult to push and manoeuvre, both for the user and the attendant. |
|
6.8. Stretch bar
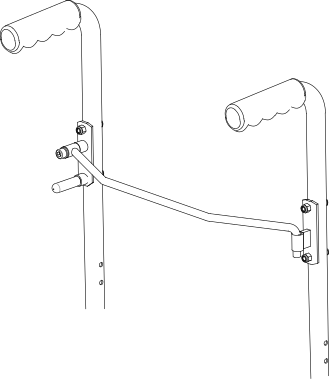
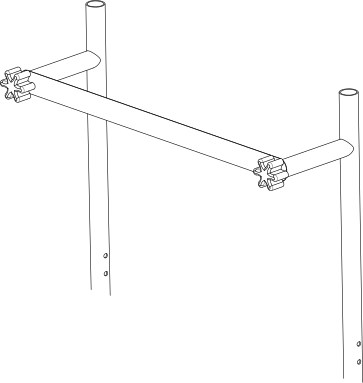
The stretch bar is a device applied to the backrest with the purpose of stabilising the geometry of the wheelchair in certain configurations. It is recommended when the height of the backrest exceeds 410 mm and becomes mandatory for certain combinations of wheelchair width and backrest height, and indispensable for configurations with reclining backrest or with absorbing springs.
|
|
Any technical incompatibilities due to the presence or absence of the stretch bar require revision or cancellation of the requested configuration. |
|
|
The stretch bar must be disengaged when closing the wheelchair. |
UNRESTRAINED STRETCH BAR |
STRETCH BAR WITH CLAMPS |
|
|
6.9. Elevating footrest
Removable and elevating footplates are available for the various OFFCARR versions.
|
|
For safety reasons, the elevating footplate must only be operated by the attendant. |
|
|
For safety reasons, the operation to return the footplate from elevated to rest must be carried out by the attendant by simultaneously operating the movement activation lever A with one hand and with the other hand accompanying the descent of the footplate. |
|
|


|
|
The footrest can be elevated to create a continuous plane with the seat: this position is unnatural for a user, so only use it if actually necessary. |
|
|
Elevating footrests are always removable and when inserted increase the overall length of the frame. |
6.10. Table
The choice of a table requires the presence of armrests in the wheelchair configuration.
The tables, which all have cutouts, are available in different materials and sizes:
Plastic (grey): |
one size, 600 mm width |
Soft padded: |
S size, 500 mm width M size, 600 mm width L size, 700 mm width |
Transparent polycarbonate table: |
S size, 500 mm width M size, 600 mm width L size, 700 mm width |
|
|
The connections between table and armrest vary depending on the model of the table itself, and the type of armrests. |
|
|
For each type of table, both central single and double attachments are available. The single attachment is not recommended in the presence of height-adjustable armrests. |
|
|
When ordering any spare parts, it is necessary to specify the serial number of the wheelchair you wish to work on, or provide the wheelchair model, and the type of armrests, elbow-rest and table used. |
Table support
|
Table support with single centre attachment
|
Polycarbonate table with double attachment
|
Polycarbonate or plastic table with double attachment
|
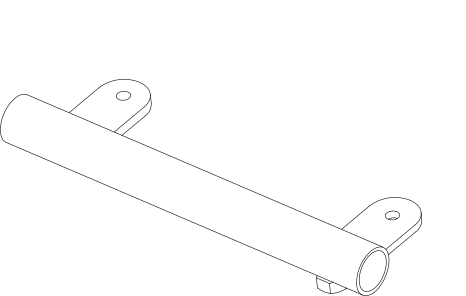
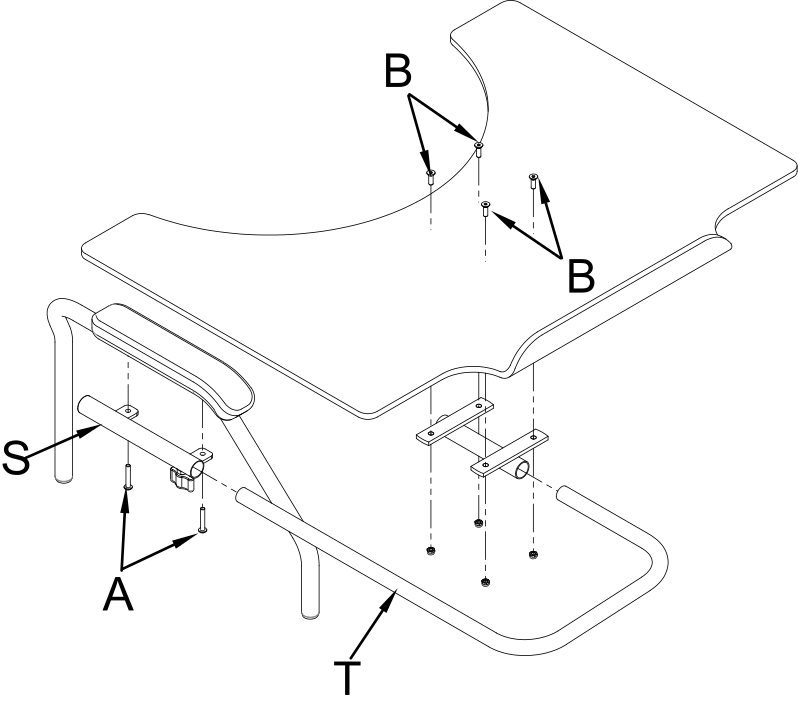
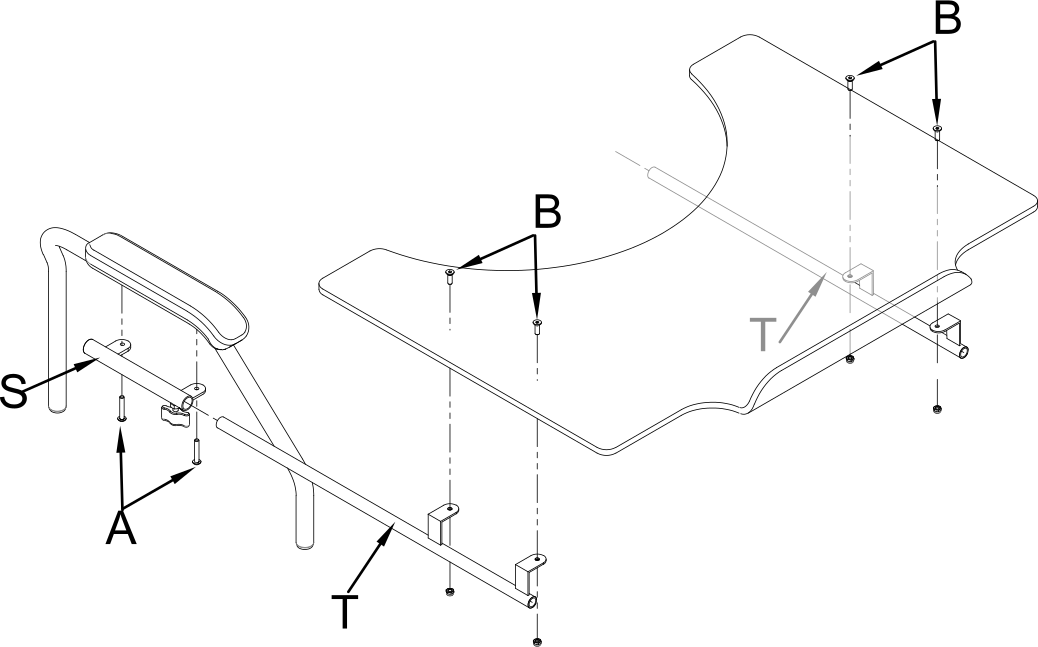
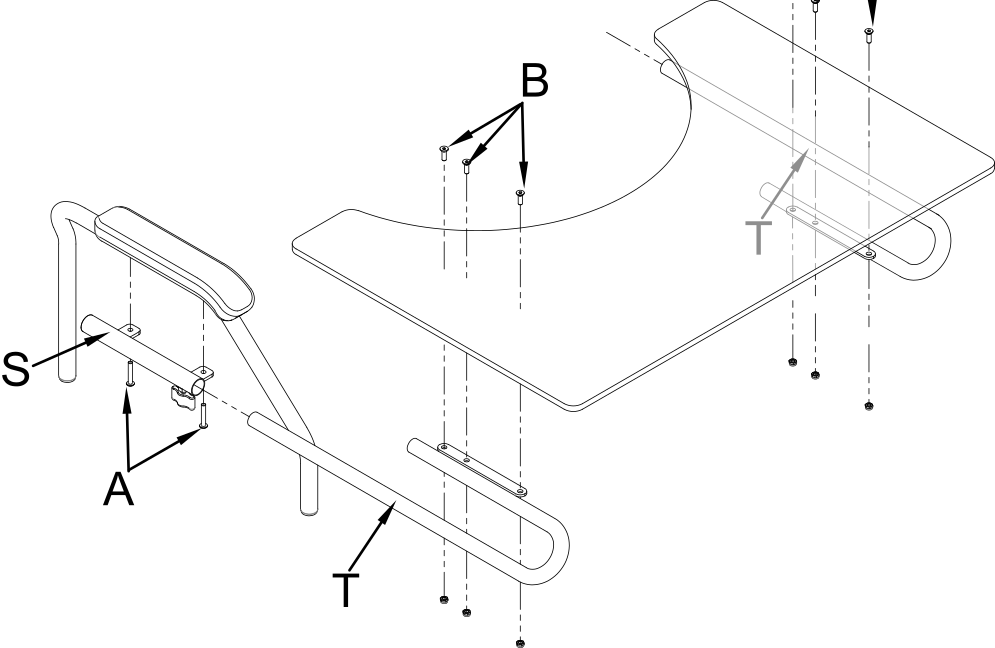
6.11. Swing away lateral supports
OFFCARR can be equipped with swing-away lateral supports.
The clamp that attaches to the backrest tube can be rotated to adjust lateral position and angle of containment. The padded support can also be independently adjusted in depth.
The padded supports are available in 4 sizes.
To unlock and open the support, simply lift it vertically by 10mm and rotate it outwards. To activate, turn the holder towards the user until it snaps into the lock when the preset position is reached. |
|
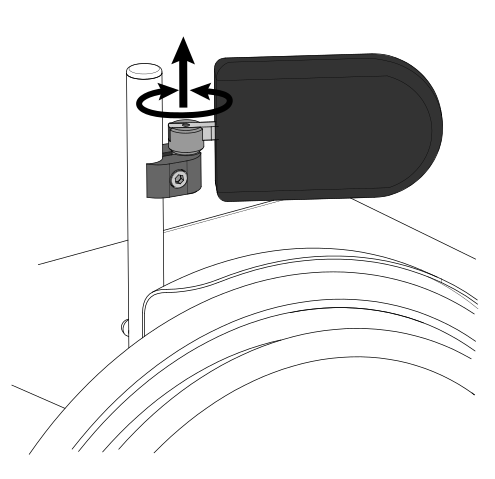
6.12. Headrest
Different kind of headrest are available:
Shaped foam headrest |
Form-fitting headrest |
Lateral supports headrest |
|
|
|
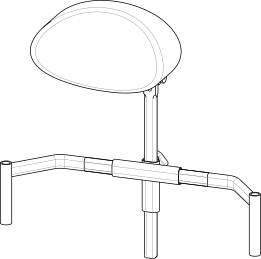
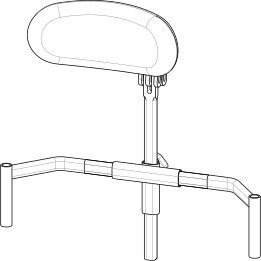
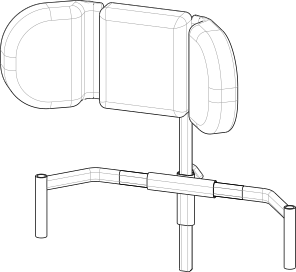
|
Adjustment of universal headrest attachment:
|
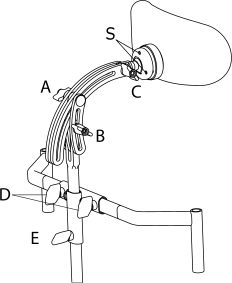
All headrests can be removed from the wheelchair by pulling them upwards.
It is possible to equip the support with a locking mechanism, this works exactly like the quick-release axle. To release it, press the button (or buttons in case of a double lock) before pulling the whole support upwards.
6.13. Pelvic band installation
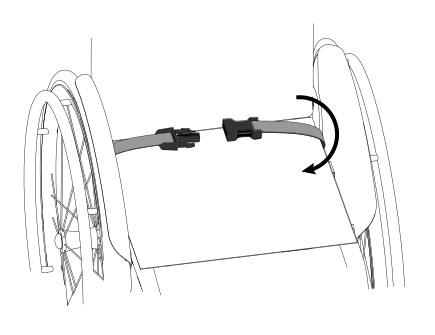
OFFCARR is designed to accommodate the installation of a pelvic band when necessary.
The 45° pelvic strap is an accessory that can be selected at the time of ordering or added later.
To install a pelvic band, wrap it around the frame passing between the backrest and the side-guard as shown in the picture 1, and connect its two flaps inferiorly through the provided velcroed areas highlighted in picture 2.
|
|
Picture 1: View of the installed pelvic band |
Picture 2: Wrap the pelvic band around the tube as in the picture |

6.14. Spokes guards
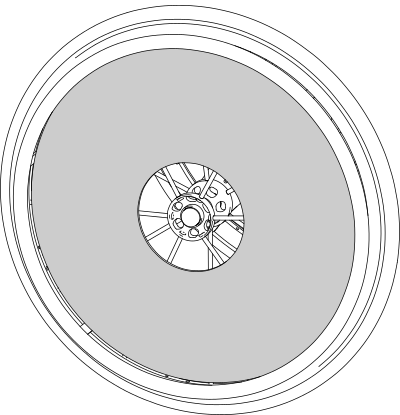
Spokes guards on the rear wheels serve as an esthetic feature as well as protection against accidental insertion of the user’s fingers or hands between the spokes of the wheels. They can be attached to the spokes with velcro or clips depending on the specific model.
|
7. Attachment of the wheelchair for use within a motor vehicle
Where clearly indicated, the wheelchair models successfully passed the crash test according to the specifications of ISO 7176-19:2008 and can therefore be used safely in motor vehicles.
|
|
Some configurations, while available on order form, can prevent the wheelchair from being vehicle-compatible. Contact OFFCARR for further information. |
|
|
It is mandatory that all of the approved wheelchair components are installed by authorized personnel following the correct technical specifications. |
|
|
Whenever feasible, it is recommended to use the vehicle seat and its manufacturer-installed restraint systems, storing the wheelchair in the vehicle’s cargo area or securing it in the passenger area. |
|
|
When transporting an occupant the wheelchair must always face forward and be securely anchored to the vehicle. |
|
|
The wheelchair has been tested only in a forward-facing orientation with the anthropomorphic test device (ATD) restrained by both pelvic and shoulder belts. |
|
|
In order to safely transport a wheelchair user in a vehicle, the vehicle must be provided with a Wheelchair Tie-down and Occupant Restraint System (WTORS) conforming to ISO 10542 or SAE J2249 standards, appropriately installed according to the manufacturer specifications. |
|
|
Both diagonal and lap belts must be used during transport to reduce the possibility, in the event of an accident, of impacts with other components inside the vehicle. |
|
|
Anchor the wheelchair with extreme care and follow the instructions given by the manufacturer or authorized installer of the anchoring system closely. When in doubt, consult the instructions for use or contact the installer of such system. |
|
|
Never transport an occupant sitting on a wheelchair unless the device is certified according to the requirements in ISO 7176-19:2008. |
|
|
Wheelchair-mounted trays, if installed, should be removed and secured separately in the vehicle. |
|
|
When possible, other auxiliary equipment must be either secured to the wheelchair or removed and secured in the vehicle. |
|
|
Postural systems, if installed, should not be relied on for occupant restraint in a motor vehicle, unless labelled as being compliant with ISO 7176-19:2008. |
|
|
In order to securely connext the wheelchair to a vehicle, all the anchoring points must be used. |
The anchoring points are indicated by the following label (according to ISO 7176-19 specifications) |
|
|
|
If the user is transported while sitting on the wheelchair, they must be wearing a seat belt. Any safety belts for vehicle transport must be installed by authorized vehicle conversion companies and must be serviced. |
|
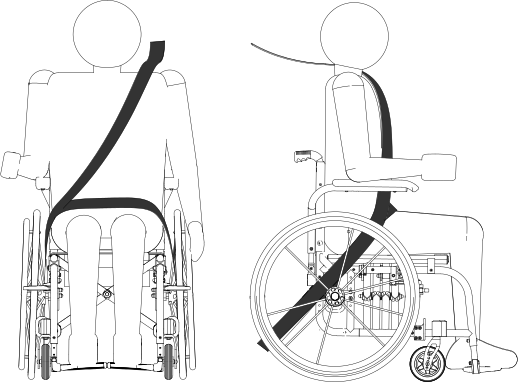
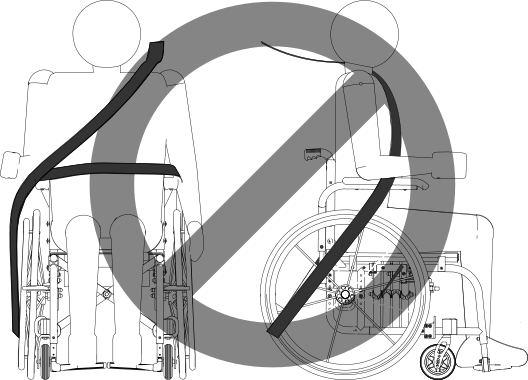
Belt restraints should make full contact with the shoulder, chest and pelvis, and pelvic belts should be positioned low on the pelvis near the thigh-abdominal junction (as shown on the drawing). |
|
Belt restraints must not be held away from the body by wheelchair components such as armrests or wheels (as shown on the drawing). |
|
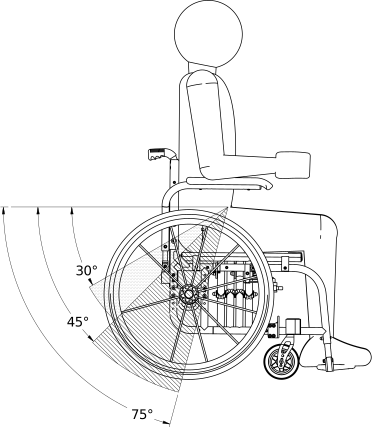
The pelvic belt restraint should be worn low across the front of the pelvis, so that the angle of the pelvic belt restraint is within the preferred zone of 30° to 75° to the horizontal (as shown on the drawing). |
|
|
If possible, it is recommended to use the restraints with a steeper angle of 45° to 75° from the horizontal (as shown on the drawing). |
|
|
Belt restraints should be as tight as possible, consistently with user comfort, and should not be twisted during use. |
|
|
Following involvement in any type of collision, the wheelchair must be inspected by an OFFCARR representative before any further use. |
|
|
No alterations or substitutions can be made to the wheelchair securement points or to structural and frame parts or components without consulting OFFCARR. |
|
|
When applying the occupant restraint, make sure to position the seatbelt buckle so that the release button is not in contact with the wheelchair components during transport or in case of a crash. |
7.1. Vehicle attachment points
7.2. Attachment of the wheelchair for use within a motor vehicle: ALHENA
|
ALHENA is provided with four (4) attachment points A for a standard 4-point floor tiedown system, as indicated in the figure. When connecting the wheelchair to a vehicle, connect the attachment system to the four marked connection points. These are the most solid points of contact on the wheelchair, and the only connection points certified by the crash test. |

8. Maintenance, inspections and controls
Weekly:
-
✓ Check the tyre pressure. Each tyre shows on the lateral bands the maximum pressure for which they are designed. A flat tyre affects the efficiency of brakes and the agility of the wheelchair.
-
✓ Check the efficiency of the quick-release axle (see 5.3, “Rear wheels release and re-engagement check”) and if necessary proceed with the lubrication of axle and bushes.
-
✓ Check the tension of the backrest upholstery to maintain a comfortable position.
Quarterly:
-
✓ Check the tightness of all the devices' screws.
-
✓ Check the perpendicularity of the front fork support screws.
-
✓ Check the wear of the front wheels. Solid wheels might be worn to the point of affecting the overall wheelchair front setup. In this case adjust the front fork assembly or replace the wheels (see 8.2, “Replacing front wheels”).
-
✓ Check the efficiency of the bearings. Replace any stuck bearings if necessary (see 8.3, “Replacing rear wheel bearings”, 8.4, “Replacing front wheel bearings” and 8.5, “Replacing front fork bearings”).
-
✓ Check the efficiency of the brakes and, in case, adjust them. If the knurled pin has to be replaced, consult authorised personnel.
-
✓ Lubricate moving parts such as hinges, bearings and quick-release axles. It is suggested to use silicon oil, which is efficient and doesn’t smear.
|
|
Only choose original parts when purchasing accessories or spare parts. Contact OFFCARR if you can’t find original spare parts on the market elsewhere. |
|
|
It is recommended to refer only to authorized and qualified personnel to perform maintenance programs, adjustments, and to replace components or accessories. |
8.1. Replacement of tyre and inner tube
8.1.1. Removing the tyre and inner tube
|
|
|
|
|
|
|
|


8.1.2. Assembling the inner tube and tyre
|
|

8.2. Replacing front wheels
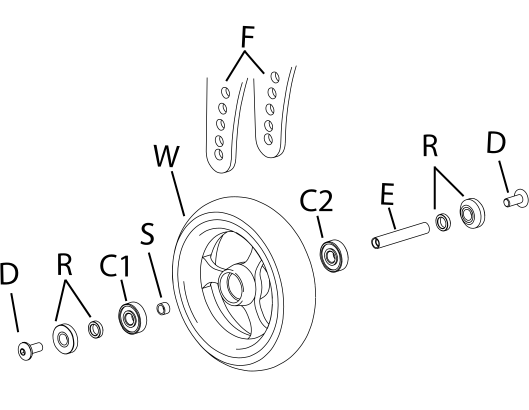
If necessary, the front wheels can be replaced:
|
|
|
|
It is important to select the same position for both wheels. Asymmetrical positions produce instability. |
|
|
Once the front wheel has been changed, it is essential to check or adjust the fork perpendicularity to the ground. |
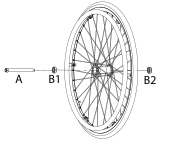
8.3. Replacing rear wheel bearings
Disassembly
|
|
Assembly
|
8.4. Replacing front wheel bearings
Disassembly
|
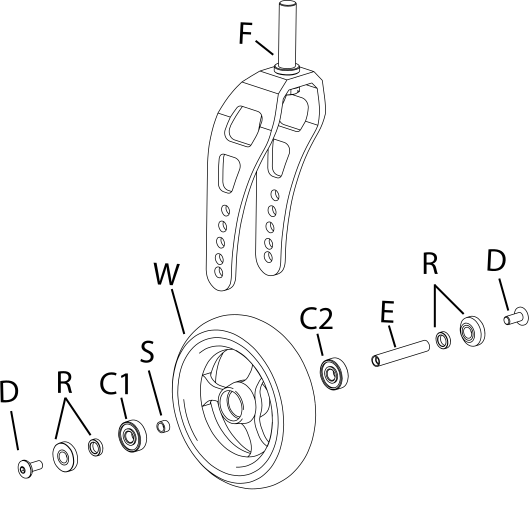
|
Assembly
|
8.5. Replacing front fork bearings
Disassembly
|
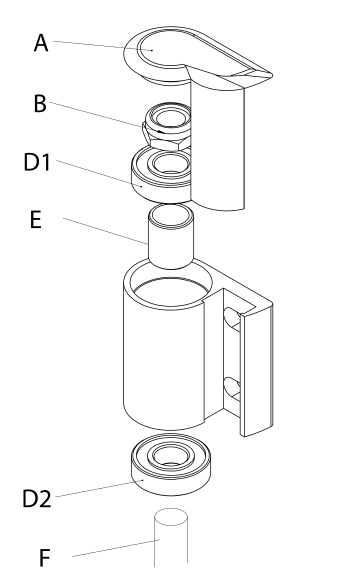
|
Assembly
|
8.6. Quick extraction devices
8.6.1. Check
The quick extraction axles are shipped already checked and adjusted. However, it is recommended to periodically verify the effectiveness of their operation.
|
|
8.6.2. Adjustment
If necessary, it is possible to adjust the axle to eliminate any play between the wheel and the frame or to complete the release of the button once the wheel is inserted. |
|

-
If the quick-release button is not completely relaxed when the wheel is inserted in the frame, it is necessary to extend the useful length of the L axle by partially unscrewing the Y nut.
-
If once the wheel has been inserted into the frame, there is play between the frame and the wheel itself, it is necessary to reduce the useful length of the L axis by partially tightening the Y nut.
|
|
The Y nut thread has a pitch of 1 mm, therefore the unscrewing or screwing of one turn involves the elongation or reduction of 1 mm. In case of adjustment, it is advisable to proceed with successive adjustments of ¼ of a turn at a time. |
9. Cleaning and disinfection instructions
|
|
Cleaning and disinfection procedure have to be performed exclusively by qualified personnel. |
|
|
Use appropriate eye/facial protection and protective gloves, during cleaning and disinfection procedure. |
In case of contamination with blood or other body fluids, the device has to be cleaned first and then disinfected as follows:
|
|
Most of the time is convenient and more effective to remove the upholstery from the frame before to proceed with the cleaning and disinfection of either frame or upholstery. |
FRAME
-
Wash the device with lukewarm water and neutral detergent using a damp cloth to remove gross soiling
-
Remove eventual detergent residuals only with lukewarm water
-
Dry the device prior to further processing
-
Visually inspect the cleanliness of the complete device
-
Disinfect the device using 70-90% alcohol
-
Be sure it is completely dry before proceeding with use
UPHOLSTERY
In case of the user remaining the same before and after the cleaning treatment:
-
Wash, rinse, dry and disinfect the upholstery using the same process used for the frame
-
Be sure the upholstery parts are completely dry before reassembling them
In case of different user after the cleaning treatment:
-
The best course of action is to change the upholsteries with a new set
|
|
During the cleaning process the device should be also carefully inspected for damage, oxidation and faults in function. If any damage or faults are found, the involved components should be removed for service, repair or replacement. |
|
|
All waste materials related to this process must be disposed in compliance with specific local applicable law. |
10. Technical service
For any service request, please contact OFFCARR supplying the following indications:
-
Model
-
Serial number
-
Fault description
-
Any reference or order number, if available, recorded on the order form.
-
Dealer
Every component of the device is available as spare part.
11. Warranty terms
It is strongly advised to register the product on the website www.offcarr.com after delivery.
-
The device’s frame is guaranteed for 3 (three) years from the delivery date.
-
The label showing the serial number, the manufacturer address and the CE symbol cannot be removed for any reason to preserve the warranty validity.
-
Parts subject to normal wear and tear are not covered by the warranty, unless specific wear is caused by evident manufacturing fault.
-
During the warranty period OFFCARR may proceed at its own discretion to change or to repair the faulty parts.
-
The warranty does not cover damage due to negligence, carelessness, misuse or by incorrect maintenance performed by non authorized personnel.
-
If any damage occurred during transport, the forwarder company is the only responsible. It is important to inform immediately both the forwarder company and, for information, OFFCARR.
-
The warranty does not cover injury or any other damage to people or goods connected to the device’s malfunctioning.
12. Packaging, shipment and delivery
All OFFCARR products are shipped in closed cardboard cases to protect them from bumps and dust.
The package includes the device configured according with the order form, this Instruction manual and a tool kit.
The device must be transported in trucks that protect it from atmospheric agents, as shown on the packaging box.
Upon receipt, check the box integrity: open the package, remove the device and check it for damages. In case of problems, note your remark on the waybill and immediately notify both the forwarder and, for information, OFFCARR.
Once these checks, mandatory to ensure the validity of the warranty, have been carried out, place again the device in its packing until it is used and store in a cool and dry place (between - 15 and + 50 °C and with a relative humidity lower than 80 %).
Do not place any objects over the packaging box.
The packaging materials follow the European directive 94/62/EC[13].
13. Material differentiation
OFFCARR products are made of aluminium alloy (Al 7020, Al 6082, Al 2017, Al 6061, Al 5754), titanium, steel (AISI 303), carbon fibre, polyurethane, epoxy resins, other composite materials.
The separation and disposal of materials must be in compliance with the local applicable laws.
Contact your dealer in case of doubt or for help when disposing the device.
14. Available sizes
The available seat sizes for each model are listed in the tables below. Refer to the price list for configuration and ordering.
| Measurement | Range | Unit |
|---|---|---|
Seat width |
34–48 |
cm |
Seat depth |
34–50 |
cm |
Rear seat height |
38–46 |
cm |
Front seat height |
42–50 |
cm |
Backrest height |
29–41 |
cm |
Seat-to-footrest distance |
33–47 |
cm |
Hub-to-backrest distance (CoG) |
3.5–8.5 |
cm |
15. Adjustments
The wheelchair is shipped to the customer in the setup chosen on the order form.
Considering potential setup restrictions it is still possible to perform other adjustment to hone in the wheelchair to the specific user.
|
|
Please refer to authorized and qualified personnel to perform the adjustments described in this manual. |
15.1. Seat Length Adjustment
|
|

15.2. Front Seat Cover Length Adjustment
|
|
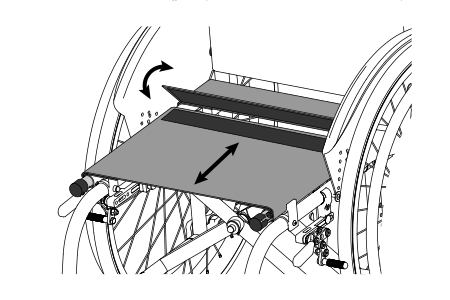
Lengthening the seat cover can only be done after extending the crossbar (see 15.1, “Seat Length Adjustment”). |
The seat cover consists of a front and a rear section, held together by a velcro area.
|
|
15.3. Rear seat height adjustment
|
|

15.4. Gravity centre (COG) adjustment
The choice of the centre of gravity is always a compromise between agility and safety. With a very active configuration, the wheelchair is very agile in pushing but requires greater skill in control. A more cautious centre of gravity increases the stability of the device at the expense of its agility.
It is an individual choice linked to the general configuration of the device, the anatomy and disability of the user, and the usage environment; a choice that determines the experience of pushing and inevitably influences daily activities.
The opportunity to vary this parameter over time allows the device to accompany the user’s motor development, optimizing their potential.
|
|
Consider that the further forward the hub is mounted, the more agile the wheelchair, while the further rearward the hub is mounted, the less active the set-up is to the benefit of safety; advancing the rear wheel with respect to the backrest axis, minimises the pushing effort and gives greater agility and smoothness to the wheelchair but reduces its safety margins against backward imbalance. |
|
|
The advancement of the rear wheel in relation to the axis of the backrest minimises the pushing effort and gives the wheelchair greater agility and smoothness, but reduces its safety margins against backward imbalance, particularly on climbs. |
|
|
If the distance between the hub centre and the projection of the backrest is reduced, the wheelchair is less active but assumes a more cautious stance. |
|
|
Make sure you have chosen the same position for the wheel bushes on both sides of the frame. Asymmetrical combinations produce instability. |
|
|

15.5. Rear wheels camber adjustment
The camber is supplied as requested in the order form. However, it is possible to change it later by replacing the rear wheel bushes:
15.6. Rear wheels camber adjustment
15.6.1. Adjusting for Non-0° Camber.
|
|
Once changed the front wheels it is essential to adjust the front fork perpendicularity (see 15.8, “Front fork support plate perpendicularity adjustment”). |
15.7. Front seat height adjustment
15.8. Front fork support plate perpendicularity adjustment
After making adjustments to the front height or replacing or repositioning the front wheels, the perpendicularity of the front fork plate, i.e. the perpendicularity of the fork pivot axis, must be checked and adjusted if necessary. This adjustment is necessary to achieve maximum steering feel and stability of the wheelchair.
|
|

|
|
Should it prove impossible to achieve perpendicularity, it is advisable to choose the position that generates an angle immediately above 90° (as shown in the figure) in order to keep the wheelchair agile when running and changing direction. |
|
|
The adjustment must be carried out symmetrically on both forks. It is important to check the symmetry carefully after each adjustment. |
15.9. Brakes adjustment
|
|
With the exception of drum brakes, the brakes provided are only suitable for parking of the aid and not for reducing the running speed. |
If the position of the rear wheel has been changed, the position of the brakes must be adjusted accordingly. Wheelchairs can be equipped with pull, push, scissor or composite brakes.
To adjust the position of the brakes:
CLASSIC BRAKES (pull or push)
|
|
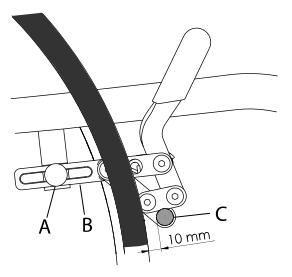
COMPOSITE AND SCISSOR BRAKES
|
|

15.10. Side-guard adjustment
Sideguards, if fitted, are attached to the wheelchair frame by means of screws which act on special slots that also allow for gradual adjustment.
In case of plastic side-guards, there is an aluminium reinforcement panel.
15.11. Backrest tension adjustment
The backrest tension can be easily adjusted by acting on the velcro straps:
|
|

|
|
The bands A which regulate the tension of the backrest, especially the highest one, must not be so tight as to reduce the width of the wheelchair, this is to allow for easy closing and opening of the wheelchair and not to damage its movement. |
15.12. Seat upholstery adjustment and replacement
15.13. Backrest height adjustment, pushing handles adjustment
The height of the backrest is chosen when ordering, but further adjustments are possible. The backrest has a telescopic section, regardless from the chosen pushing handles model.
|
|

-
In the presence of side-guards, remove the screws securing them to the frame and take off the corresponding support loop. Adjust the height of the backrest tube and then restore the position and fastening of the side-guards.
|
|
The same procedure can also be followed if the wheelchair has no pushing handles or is configured with height adjustable handles. |
15.14. Height adjustable pushing handles adjustment
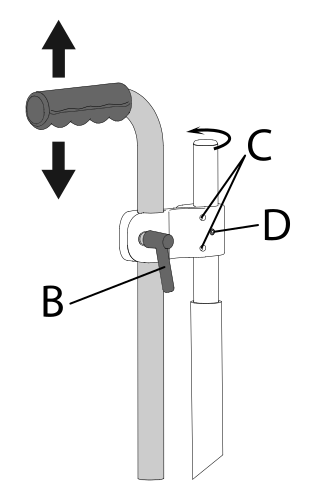
If the wheelchair is equipped with height adjustable pushing handles it is possible to adjust them:
|
|
|
|
To change the rest position of the lever B, pull it slightly outwards to release its engagement and rotate it to the new position. |
|
|
The clamp that connects the pushing handle to the wheelchair frame can be rotated around the backrest tube. If necessary, unscrew the safety screw D before turning the screws C to loosen the clamp and allow it to rotate. Once the bracket is secured in its new position, tighten the C screws and then the D safety screw appropriately. |
15.15. Footrest height adjustment
The telescopic footrest support is inserted into the front of the frame and secured through a screw and nut couple E for each side of the frame.
|
|

15.16. Footplate tilt adjustment
15.16.1. Single aluminium profile footplate
If the wheelchair is fitted with an aluminium profile single footplate, the orientation of the footplate can be adjusted as follows:
|
|

15.16.2. Separate aluminium footplates
If the wheelchair is fitted with separate aluminium profile footplates, the orientation of the footplates can be adjusted as follows:
|
|
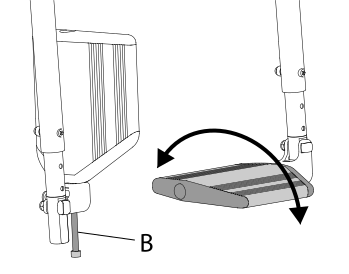
15.16.3. Plastic footplates
If the wheelchair is fitted with plastic footplates, the orientation of the footplates can be adjusted as follows:
|
|

15.17. Pushrim with rivets
Replacement |
|
|
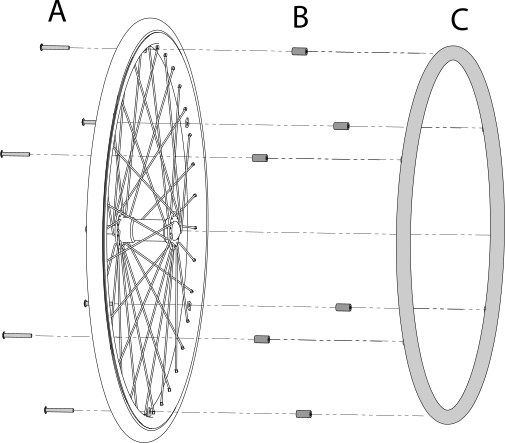
Adjust the distance between pushrim and rim
|
15.18. Pushrim with splices
Replacement |
|
|
Adjust distance between pushrim and rim |
|
|
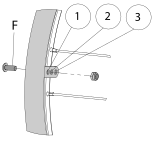
15.19. Anti-tip device adjustment on curved rear frames
The operating height of the anti-tip device is defined during installation. However, if necessary it is possible to change its distance from the ground and thus vary the intervention threshold.
15.19.1. Ground clearance adjustment
|
|

15.19.2. End terminal adjustment
|
|

15.20. Anti-tip adjustment on straight rear frames
15.20.1. Ground clearance adjustment
The operating height of the anti-tip device is defined during installation. However, if necessary it is possible to change its distance from the ground and thus vary the intervention threshold. If the anti-tip device is fitted in combination with narrow passage wheels, any adjustment must take this into account.
|
|
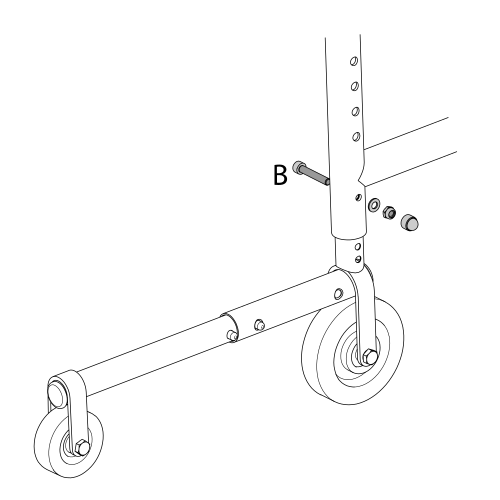
15.21. Height adjustment for lever-activated small wheels
The position of the lever-activated small wheels is defined during the assembly. However it is possible to change its distance from ground if the rear height has been changed (limited to a small range near the original height)
|
|
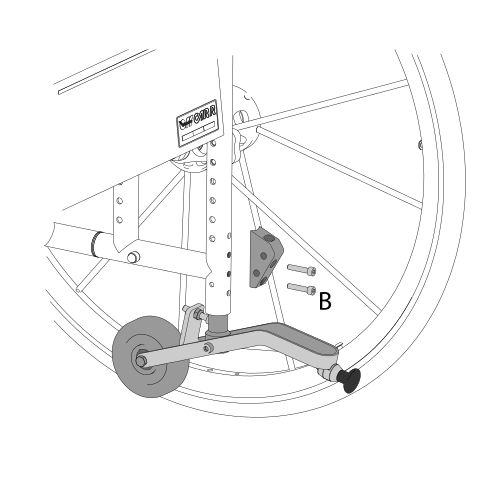
15.22. Table installation
To install the table on a wheelchair:
-
Loosen and remove the A screws that connect the elbow-rest to the armrest;
-
Mount the table support paying attention to its direction (right or left) and fix it using two new screws 5 mm longer than the ones removed
-
Put the table supporting tubes in place and fix them to the preferred depth with the B wing screw;
-
Fix the supports to the table with the C screws.
Table support
|
Table support with single centre attachment
|
Polycarbonate table with double attachment
|
Polycarbonate or plastic table with double attachment
|
15.23. Abductor assembly
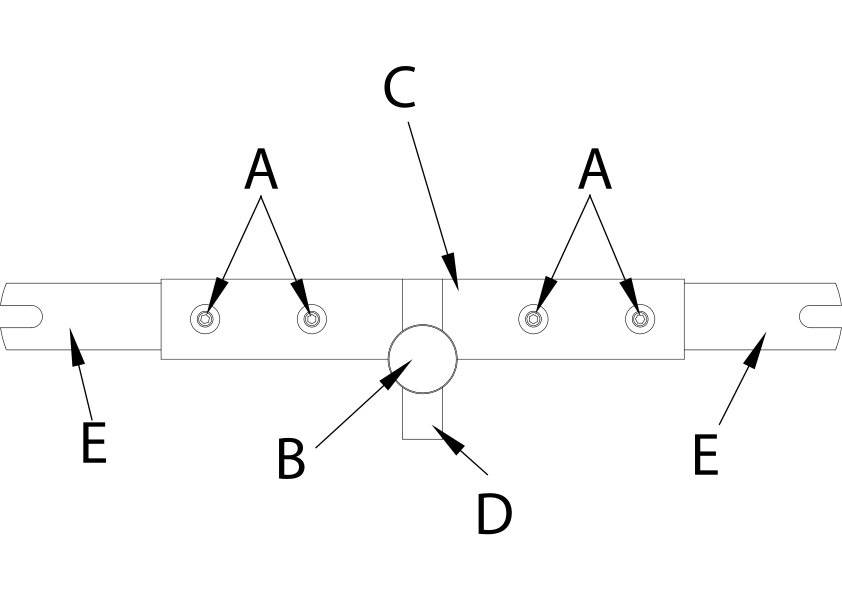
On OFFCARR wheelchairs, a pull-out abductor can be fitted.
Follow the instructions below for fitting:
-
Mount the supplied blocks H on the side tubes of the frame
-
Loosen the screws A on the support bar without removing them
-
Assemble the support bar by inserting the lateral ends into the guides of the brackets H, paying attention to the knobs M, and fix the screws A to lock the width
-
Insert the sliding support of the abductor into its guide and secure it with the wing screw N.
To adjust the depth of the abductor, or remove it to facilitate transfers or other manoeuvres of the user in the wheelchair, act as follows:
-
Loosen the wing screw N
-
Position the dock to the desired depth and tighten the wing screw N or completely remove the abductor knob from the seat.
In this case of only removing the abductor knob, the support bar remains mounted on the wheelchair and does not allow it to be closed for transport.
To fold the wheelchair it is essential to remove the abductor knob with the support bar:
-
Pull one of the two knobs M to release the support bar;
-
Remove the support bar by pulling it out of its slots in an arching motion.
The bar can be removed with or without the knob inserted. With the user sitting in the wheelchair, it is recommended to remove the abductor knob separately and then the support bar if necessary.
Support bar
|
Scheme of the abductor parts
|
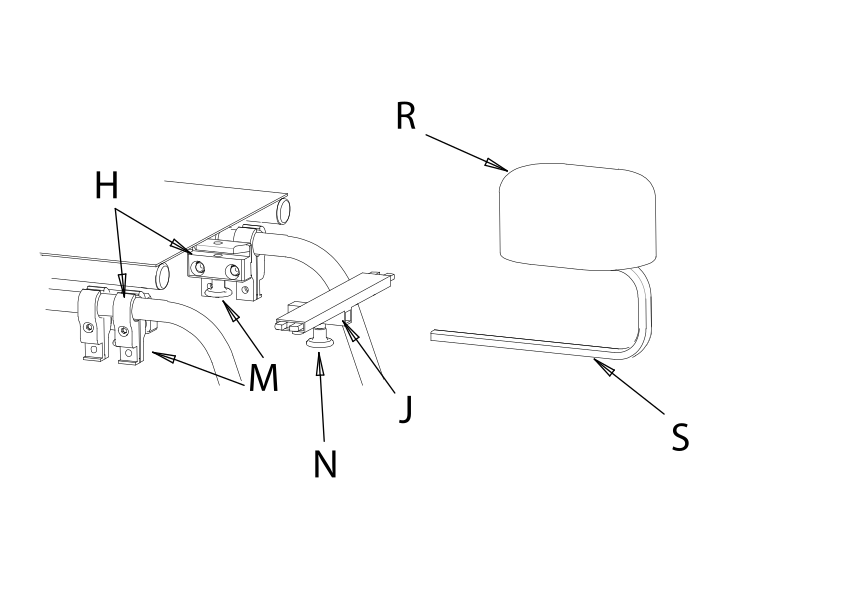
-
The distance between the seat and the abductor can be reduced by 20 mm by turning the support bar upside down.
-
The sliding support bar is available in various heights, depending on the required distance between the seat canvas and the base of the abductor knob, to suit different cushion options.
15.24. Assembly and adjustment of swing-away lateral supports
Swing-away lateral supports are accessories that can be provided at the time of ordering or can also be fitted later without special arrangements. Their fastening system allows a wide flexibility in finding the preferred positioning while always maintaining the characteristic of openness to facilitate transfers, dressing etc.
It is possible to adjust the height A, the angle between the clamp and the backrest B, the angle of the support C, and the depth position of the soft support D |
|

15.24.1. Height and width support adjustment
|
|
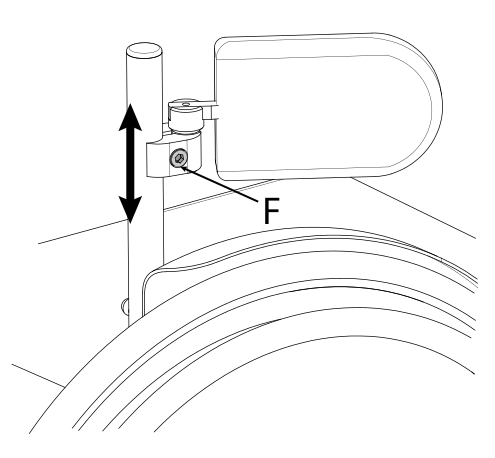
15.24.2. Depth position adjustment:
|
|
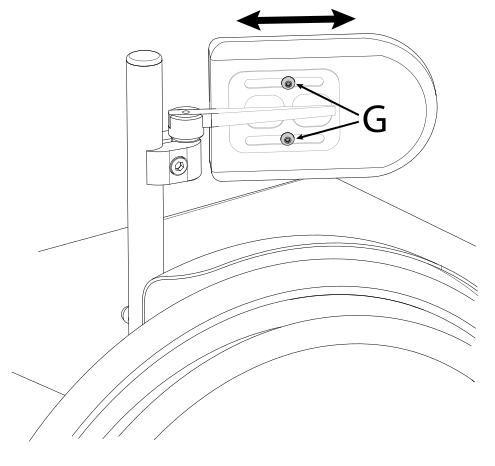
|
|
Any serious incident occurring in relation to the device must be reported to the manufacturer OFFCARR and to the competent authority of the Member State in which the user and/or the patient is established. |
OFFCARR s.r.l. reserves the right to make improvements and/or changes on its products, at any time without prior notice, with respect of the device features, suitability, certifications, warranty contract and availability of spare parts according to the terms of law.
IFU_OFFCARR_ALHENA_EN_R0